This easy homemade ricotta cheese recipe is simple, affordable, and made with just three ingredients—perfect for a fresh, creamy addition to any meal. Skip the store-bought stuff and make your own homemade ricotta in less than 30 minutes with minimal effort!
Jump to Recipe
WHY YOU WILL LOVE THIS QUICK FRESH RICOTTA RECIPE
This quick fresh ricotta recipe is rich, creamy, and far superior to store-bought versions, and this recipe gives you the perfect way to make it at home in no time. It’s incredibly versatile, whether you're making a lasagna, pizza, or a simple toast topping, and the best part—it’s incredibly affordable!
Jump to:
- WHY YOU WILL LOVE THIS QUICK FRESH RICOTTA RECIPE
- INGREDIENTS FOR EASY HOMEMADE RICOTTA
- HOW TO MAKE THIS QUICK FRESH RICOTTA RECIPE
- FAQs: All About Milk, Storage, and More!
- Transform Your Ricotta and Whey - Tasty Ideas to Try:
- Use Homemade Ricotta in these recipes:
- EQUIPMENT NEEDED
- Featured Farm: Redmond Heritage Farms
- Easy Homemade Ricotta
- Diet Categories
INGREDIENTS FOR EASY HOMEMADE RICOTTA
- Whole Milk: The star of this recipe, whole milk provides the richness and creaminess that make your ricotta so satisfying. It is essential for creating a smooth, soft texture in the finished cheese.
- Lemon Juice: Freshly squeezed lemon juice gives the ricotta its slight tang and helps the milk separate into curds and whey. It’s a natural acid that acts as a coagulant to help form the cheese.
- Kosher Salt: Kosher salt enhances the flavor of the ricotta, adding just the right amount of seasoning. It can also be added later to taste for those who prefer a milder flavor or want to control the saltiness.
- Cheesecloth: Cheesecloth is essential for straining the curds from the whey, helping to achieve that desired texture in the ricotta. It allows the liquid to drain while keeping the curds intact for that creamy cheese consistency.

HOW TO MAKE THIS QUICK FRESH RICOTTA RECIPE
- Heat the Milk: In a 4-quart pot, slowly heat 8 cups of whole milk over medium heat. Stir occasionally to prevent scorching. Once the milk reaches 200°F (93°C), it will become foamy and start to steam. If the milk starts to boil, remove the pot from the heat immediately. Important: do not use ultra-high temperature pasteurized milk a.k.a. UHT milk, see recipe notes.
- Add Acid and Salt: Turn off the heat and gently stir in ⅓ cup of freshly squeezed lemon juice (or ½ teaspoon citric acid). At this point, you can also stir in 2 teaspoons of kosher salt, if you’d like to season your ricotta now. If you prefer, you can add the salt after straining for a milder flavor.
- Let It Sit: Allow the milk mixture to sit undisturbed for 10 minutes. You should see the milk separate into white, lumpy curds and yellowish, watery whey. If the milk hasn’t fully separated, don’t worry! Simply stir in an additional tablespoon of lemon juice (or vinegar) and let it sit for a few more minutes.
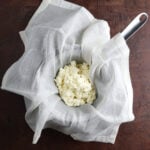
- Prepare Cheesecloth: While the milk is resting, line a colander with cheesecloth. If you don’t have cheesecloth, you can use a clean kitchen towel. Set the colander over a large bowl to catch the whey.
- Drain the Ricotta: Let the curds drain for about 10-15 minutes for a creamier ricotta or longer for a drier, firmer texture (up to 60 minutes). The whey will collect in the bowl below. Shorter draining times will yield creamier ricotta, while longer draining will make it firmer. If the ricotta becomes too dry during draining, feel free to stir some of the reserved whey back in to adjust the texture to your liking.
- Final Seasoning and Storage: If you didn’t add salt earlier, now is the time to mix in the remaining 2 teaspoons of kosher salt, if desired. Fresh ricotta can be used immediately or stored in an airtight container in the fridge for up to 1 week.
FAQs: All About Milk, Storage, and More!
Milk Options:
- 2% Milk: While we love whole milk for that rich, creamy texture, you can totally use 2% milk if that’s what you have on hand. The ricotta will be a little lighter, but still delicious! Just be sure to steer clear of skim and nonfat milks—those won’t separate as easily into the perfect curds and whey.
- Pasteurized Milk: Regular pasteurized milk works just fine for making ricotta, but here’s a little tip: steer clear of UHT (Ultra High Temperature) pasteurized milk. UHT milk changes the protein structure, making it harder to get those lovely curds to form. Stick with the good stuff, and your ricotta will be perfect every time!
Storing Homemade Ricotta:
- Fresh ricotta is best enjoyed right away, but if you have leftovers, you can store it in an airtight container in the fridge for up to a week. Just be sure to keep it sealed tight to preserve its freshness.
Transform Your Ricotta and Whey - Tasty Ideas to Try:
- Making Ricotta Salata: Want to turn your fresh ricotta into a firmer, saltier cheese like ricotta salata? Simply wrap your ricotta in cheesecloth, press it under a plate (use a weight to help it along), and let it sit in the fridge overnight. This extra step helps to squeeze out even more whey, giving you a cheese that's perfect for crumbling on salads or pasta!
- What to Do with the Whey: Don’t throw away that leftover whey! It's packed with nutrients and can be used in so many ways. The leftover liquid after straining the ricotta is buttermilk, which you can use. Swap it out for water in baking recipes, add it to pancakes, or smoothies for an extra protein boost, or just enjoy a refreshing glass over ice. It’s a great way to avoid waste and get more from your homemade ricotta!

Use Homemade Ricotta in these recipes:
- Creamy Lemon Ricotta Pasta with Spinach
- Cornmeal and Ricotta Cake with Fresh Berries
- Apricot Ricotta Cake
EQUIPMENT NEEDED
- 4-quart pot
- Skimmer Slotted Spoon
- Cheesecloth or clean kitchen towel
- Colander
- Thermometer (optional but helpful)

Featured Farm: Redmond Heritage Farms
Real Raw Milk - Redmond is driven by a simple mission: to provide truly natural farm products for those seeking optimal health. As one of Utah’s few raw milk dairies, we go beyond standard practices—testing our milk’s nutrition quarterly to ensure quality, sustainability, and animal wellness. Our cows graze freely on green pastures and enjoy a roughage-based diet with fresh green fodder in winter, because healthy, happy cows make clean, nutrient-rich milk. Follow this link to learn more in-depth knowledge about Redmond Real Raw Milk
Why This Farm’s Raw Milk is Safe & Special
1. Unprocessed for Natural Benefits
- Unpasteurized: Preserves key enzymes that support gut health and immunity.
- Unhomogenized: Keeps natural fat molecules intact for easier digestion and better fat metabolism.
2. Grass-Fed Goodness
- Cows eat a mostly forage-based diet, producing milk richer in CLA and Omega-3s (2–3x higher than conventional milk).
- The farm adjusts feed based on quarterly nutrition tests to maintain optimal health benefits.
3. Exceptional Safety Standards: Every batch is tested to meet or exceed pasteurized milk standards.
- SPC (Standard Plate Count): Usually under 1,000 CFU (well below the legal limit of 20,000).
- Coliforms: Typically 0–3 (limit is 10).
- Proactive testing for Salmonella, E. coli, Listeria, and Campylobacter—even though it’s not required.
- Monthly herd health checks (SCC) and antibiotic testing.
- Strict hygiene: Clean udders, sanitized equipment, and careful handling every step of the way.
Easy Homemade Ricotta
Ingredients
- 8 cups whole milk (1.9 L)
- ⅓ cup freshly squeezed lemon juice (80 ml), from 2 lemons
- 2 teaspoons kosher salt (10 g)
- Cheesecloth
Instructions
- Heat the Milk: In a 4-quart pot, slowly heat 8 cups of whole milk over medium heat. Stir occasionally to prevent scorching. Once the milk reaches 200°F (93°C), it will become foamy and start to steam. If the milk starts to boil, remove the pot from the heat immediately. Important: do not use ultra high temperature pasteurized milk a.k.a. UHT milk, see recipe notes.
- Add Acid and Salt: Turn off the heat and gently stir in ⅓ cup of freshly squeezed lemon juice (or ½ teaspoon citric acid). At this point, you can also stir in 2 teaspoons of kosher salt, if you’d like to season your ricotta now. If you prefer, you can add the salt after straining for a milder flavor.
- Let It Sit: Allow the milk mixture to sit undisturbed for 10 minutes. You should see the milk separate into white, lumpy curds and yellowish, watery whey. If the milk hasn’t fully separated, don’t worry! Simply stir in an additional tablespoon of lemon juice (or vinegar) and let it sit for a few more minutes.
- Prepare Cheesecloth: While the milk is resting, line a colander with cheesecloth. If you don’t have cheesecloth, you can use a clean kitchen towel. Set the colander over a large bowl to catch the whey.
- Drain the Ricotta: Let the curds drain for about 10-15 minutes for a creamier ricotta or longer for a drier, firmer texture (up to 60 minutes). The whey will collect in the bowl below. Shorter draining times will yield creamier ricotta, while longer draining will make it firmer. If the ricotta becomes too dry during draining, feel free to stir some of the reserved whey back in to adjust the texture to your liking.
- Final Seasoning and Storage: If you didn’t add salt earlier, now is the time to mix in the remaining 2 teaspoons of kosher salt, if desired. Fresh ricotta can be used immediately or stored in an airtight container in the fridge for up to 1 week.
Notes
- Whole Milk Options: This is a good time to use whole raw whole milk, since the cooking process pasteurizes raw milk. Pasteurized milk is fine to use for making ricotta, but avoid Ultra High Temperature pasteurized milk, also known as UHT milk. The UHT process changes the protein structure of the milk, preventing it from separating.
- Storage: Fresh ricotta can be refrigerated in an airtight container for up to 1 week.

Nutrition

Diet Categories
The diet categories listed below are offered as a helpful guide, not as nutritional advice. While I’m not a dietitian, I am a professional baker by day with a deep love for seasonal produce and savory cooking at home. Bite Me Industries is a produce-forward blog that celebrates the flavors of each season through crave-worthy bakes and vibrant, flavor-driven recipes — the kind that transport you to your favorite bakery, café, or cozy bistro.
Here is a quick reference if you are trying to meet a dietary consideration.
- EF = Egg Free: This recipe does not include eggs, so it is egg-free.
- GF = Gluten-free: This recipe is gluten-free as it contains no wheat or gluten-based ingredients.
- NF = Nut Free: This recipe is nut-free as it does not contain any nuts.
- SF = Sugar Free: This recipe is free of added sugars.
- VE = Vegetarian: This recipe is vegetarian as it uses dairy products and no meat or animal products besides milk.
- Keto: This recipe can be considered keto-friendly as it is low in carbs.
Leave a Reply