Learning how to brown butter is one of the simplest ways to transform your cooking. In just a few minutes, ordinary butter turns nutty, golden, and deeply aromatic, adding rich complexity to both sweet and savory recipes.
If you have ever wondered how to make browned butter at home, this step-by-step guide will show you exactly what to look for, when to stop, and how to scale it confidently. Once you master this technique, you will reach for it instinctively.
Jump to Recipe
Why Brown Butter Is Worth the Extra Step
Brown butter is one of the simplest ways to elevate a recipe without adding a single extra ingredient. As the milk solids toast, they develop a warm, nutty aroma and subtle caramel notes that plain melted butter simply cannot deliver.
In baked goods, brown butter brings depth. Cookies taste fuller. Cakes feel intentional. Frostings gain dimension. Even banana bread feels layered and thoughtful.
In savory cooking, it becomes a finishing sauce with character. Drizzle it over roasted vegetables, pasta, fish, or grains, and the flavor instantly feels balanced and complete.
This is the kind of technique that honors the ingredient and rewards patience with complexity.
Jump to:
What Is Brown Butter?
Brown butter, sometimes called beurre noisette, is simply butter that has been gently cooked until its milk solids toast. As butter melts, the water content evaporates. What remains behind are milk proteins and butterfat. As the water cooks off, those milk solids sink to the bottom of the pan and begin to brown.
This browning process is where the magic happens. The milk solids toast and turn golden, then amber, developing a deep, nutty aroma and a lightly caramelized flavor. The color shifts from pale yellow to a rich golden brown. The transformation is both visual and aromatic.
In simple terms, brown butter is butter with its flavor intensified.
Unsalted or Salted Butter?
Unsalted butter gives you more control over seasoning, which is why many bakers prefer it. That said, if you have salted butter on hand, use it. Just reduce the added salt in the recipe to balance the flavor. Brown butter is about toasted milk solids, not the salt content.

How to Brown Butter Step by Step
Ingredients (for one half cup): Butter: 10 tablespoons (142 g), unsalted or salted
Once you master this technique, you will begin reaching for it instinctively.
- Butter Volume: If you need a specific amount of brown butter for a recipe, measure the amount called for and begin with 20 percent more butter to account for natural moisture loss during browning. For example, if a recipe calls for ½ cup (113 g) of brown butter, start with 10 tablespoons (142 g) of butter. If a recipe calls for 1 cup (227 g) of brown butter, begin with 272 g of butter. Apply this same 20 percent increase to any quantity. This is the scalable technique.
- Choose Your Pot: Use a heavy bottomed saucepan. Stainless steel or light colored ceramic allows you to clearly see the butter change color, which helps prevent burning.
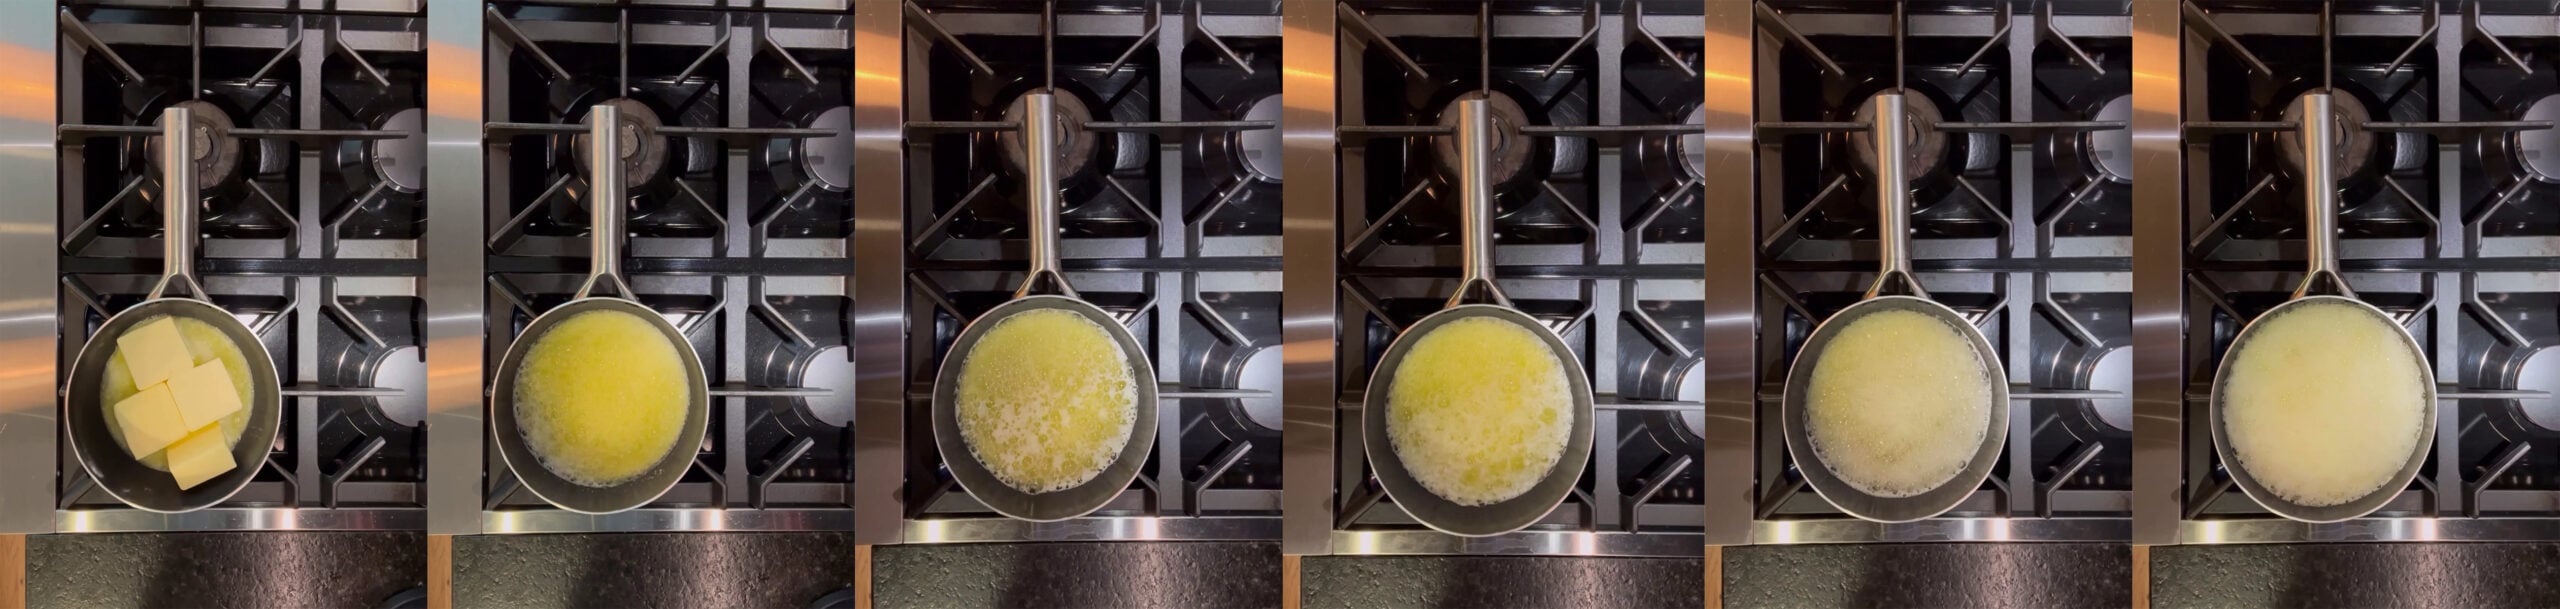
- Melt the Butter: Add the butter to the pot and set it over medium heat. The butter will melt, begin to bubble, and release its water content. Do not walk away at this stage. Salted or unsalted both work here. Unsalted offers more control over seasoning, but if salted is what you have on hand, simply reduce the added salt in your recipe slightly.
- Watch for the Billow Stage: As the water cooks off, the butter will pop and sizzle quite loudly. When the noise begins to quiet, the butter will foam and rise in a tall, fine-bubbled, airy billow. This signals that the milk solids are beginning to toast.
- Look for Color Change: Stir gently as the foam shifts from pale to golden. Once you see small brown flecks forming beneath the foam and the butter turns a deep golden amber with a nutty aroma, remove the pot from the heat immediately.
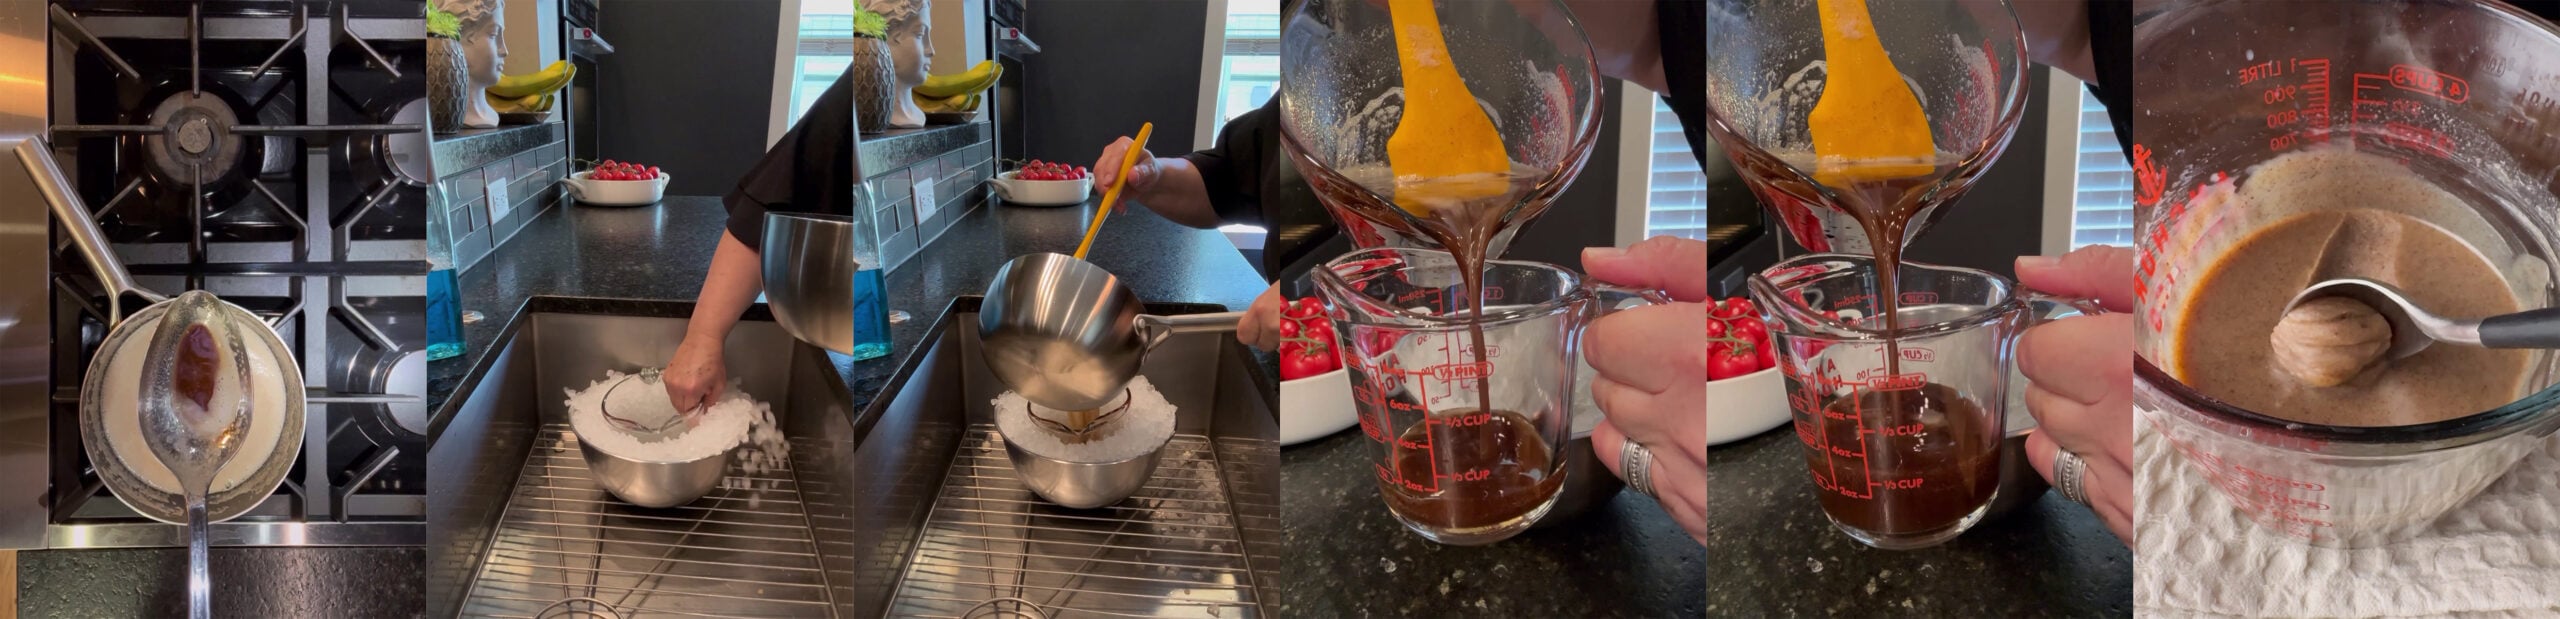
- Stop the Cooking: Continue stirring to reveal the toasted milk solids. Pour the butter into a heat safe bowl, scraping in all the browned bits from the bottom. This stops the cooking process.
- Optional Quick Cool: If your recipe calls for cooled brown butter, you may place the bowl over an ice bath and stir until thickened but still pourable, then transfer to a container or use as needed. This can work as a fun spreadable option too, for toast, when kept at room temperature.
Bite Me Make Ahead Tip: Pour the warm brown butter into silicone molds that hold 113 grams each. Freeze until solid, remove from the molds, wrap individually, and return to the freezer. Now you have perfectly portioned brown butter ready whenever you need it.

Troubleshooting Brown Butter
Even experienced cooks miss the mark occasionally. Here is how to fix the most common issues.
- It turned black: If the milk solids are very dark brown or black and the aroma smells bitter or acrid, the butter has burned. Unfortunately, it cannot be saved. Start over and reduce the heat slightly next time.
- It smells sharp instead of nutty: A sharp smell means it went too far. Brown butter should smell warm and toasted, not harsh. Remove from heat the moment it reaches deep golden amber.
- It foamed too much: Foaming is normal. Butter releases water as it cooks. Continue stirring gently and watch for the foam to subside and the brown flecks to appear beneath it.
- It looks cloudy: Cloudiness usually means the butter has cooled and begun to solidify. Gently rewarm it over low heat if you need it liquid.
- It separated: Separation can happen as it cools. Stir to recombine. The flavor remains intact.
How to Store Brown Butter
Brown butter stores beautifully, making it an excellent make-ahead ingredient.
- Room Temperature: If using within a few hours, allow the brown butter to cool at room temperature until it thickens slightly but remains pourable.
- Refrigerated: Store in an airtight container in the refrigerator for up to one week. It will solidify as it chills. Rewarm gently before using if needed.
- Frozen Portions: For longer storage, freeze brown butter in pre-measured portions. Pour the warm brown butter into silicone molds that hold 113 grams each. Freeze until solid, remove from the molds, wrap individually, and return to the freezer. Store for up to three months.
Having pre-portioned brown butter ready in the freezer makes it easy to add nutty depth to recipes whenever inspiration strikes.

Recipes That Shine with Brown Butter
Once you know how to brown butter, you begin seeing opportunities everywhere. I reach for it when I want a layer of warmth that feels intentional rather than loud.
In Banana Cake with Brown Butter Frosting, the nutty depth balances sweetness and makes each slice feel finished. Pumpkin Cheesecake with Brown Butter Graham Crust takes a familiar dessert and gives it quiet complexity.
Strawberries and Cream Baked Oatmeal with Browned Butter becomes richer without feeling heavy, while Brown Butter Chai Focaccia leans into spice and warmth in a way that feels almost nostalgic.
These recipes are proof that a small shift in technique can completely change the character of a dish.

Equipment Needed
- Heavy-Bottomed Saucepan: A stainless steel or light-colored saucepan helps you clearly see the milk solids as they brown and prevents scorching.
- Heat-Resistant Silicone Spatula or Wooden Spoon: Essential for stirring gently and scraping every toasted milk solid from the bottom of the pan.
- Heat-Safe Bowl: Use a glass or stainless steel bowl to immediately stop the cooking process once the butter reaches deep amber.
- Digital Kitchen Scale: Useful for applying the 20 percent scaling method accurately when learning how to brown butter for specific recipe yields.
- Fine-Mesh Strainer (Optional): Helpful if you prefer a smoother finished butter without visible brown flecks, though I recommend keeping them for flavor.
- Silicone Molds (Optional): Perfect for freezing 113 g pre-measured portions so you always have brown butter ready in your freezer.
FEATURED DAIRY FARMER: Cache Meadow Creamery
At the heart of so many great ingredients is a humble story. That’s certainly true of Cache Meadow Creamery, farm fresh dairy and butter quality you can almost taste before your first bite of browned butter.
Cache Meadow Creamery began simply, with one cow and a back-porch milking station back in 2017. What started with a dream and two willing hands has grown into a family-run dairy dedicated to caring for the land, the animals, and the people who enjoy their products. Each batch of grass-fed A2 milk, cultured butter, and cream is produced with intention and pride, turning everyday dairy into something deeply rooted in place and care.
When you brown butter in your own kitchen, think of the cows grazing those Idaho pastures and the farmers who rise early to nurture them. That connection, from farm to table, is the kind of quiet labor that transforms simple ingredients into something memorable.

Ingredients
- 10 tablespoons butter (142 g)
Instructions
- MELT THE BUTTER: Place the butter in a heavy bottomed saucepan over medium heat. The butter will melt, begin to bubble, and release its water content. Do not walk away at this stage.10 tablespoons butter
- WATCH THE BILLOW STAGE: As the water cooks off, the butter will pop and sizzle loudly. When the noise quiets, the butter will foam and rise in a tall, fine, airy billow. This signals that the milk solids are beginning to toast.
- LOOK FOR THE COLOR CHANGE: Stir gently as the foam turns from pale to golden. Once small brown flecks form beneath the foam and the butter turns deep golden amber with a nutty aroma, remove from the heat immediately.
- STOP THE COOKING: Pour into a heat safe bowl, scraping in all the browned bits. This stops the cooking process.
- COOL IF NEEDED: If your recipe requires cooled brown butter, stir over an ice bath until thickened but still pourable.
Notes
- Butter Volume: If you need a specific amount of brown butter for a recipe, measure the amount called for and begin with 20 percent more butter to account for natural moisture loss during browning. For example, if a recipe calls for ½ cup (113 g) of brown butter, start with 10 tablespoons (142 g) of butter. If a recipe calls for 1 cup (227 g) of brown butter, begin with 272 g of butter. Apply this same 20 percent increase to any quantity. This is the scalable technique.
- Choose Your Pot: Use a heavy bottomed saucepan. Stainless steel or light colored ceramic allows you to clearly see the butter change color, which helps prevent burning.
- Melt the Butter: Add the butter to the pot and set it over medium heat. The butter will melt, begin to bubble, and release its water content. Do not walk away at this stage. Salted or unsalted both work here. Unsalted offers more control over seasoning, but if salted is what you have on hand, simply reduce the added salt in your recipe slightly.
- Watch for the Billow Stage: As the water cooks off, the butter will pop and sizzle quite loudly. When the noise begins to quiet, the butter will foam and rise in a tall, fine-bubbled, airy billow. This signals that the milk solids are beginning to toast.
- Look for Color Change: Stir gently as the foam shifts from pale to golden. Once you see small brown flecks forming beneath the foam and the butter turns a deep golden amber with a nutty aroma, remove the pot from the heat immediately.
- Stop the Cooking: Continue stirring to reveal the toasted milk solids. Pour the butter into a heat safe bowl, scraping in all the browned bits from the bottom. This stops the cooking process.
- Optional Quick Cool: If your recipe calls for cooled brown butter, you may place the bowl over an ice bath and stir until thickened but still pourable, then transfer to a container or use as needed. I like this for spreadability on toast, and to suspend the nutty bits throughout the butter evenly.

Leave a Reply